Operation, Installation, Safety, and Maintenance
Shark Ltd is not responsible for any injuries or damages caused by installation, operation, or maintenance of Shark products. This Operation and Maintenance Manual serves as a guide only.
Owners need to register here to receive a 3 year warranty and service updates.
Warranty Policy
Please see the Shark Worldwide Warranty Policy here.
Important note on posture for comfort and safety
- Occupants must be seated to the rear of the seat, with no air gap between them and the seat back.
- Footpegs will be necessary for those less than 1.7m tall when using the standard Shark 200 mm plinth and Jockey style seat.
- Do not jump or stand on footpegs, they are to be used while seated only.
- In the case of Jockey seats, the user must be seated with feet flat on the same surface that the plinth is mounted to, or using the supplied Shark footpegs. Using other footrests (especially those that are substantially in front of the seat) can cause injury to the occupant, and damage to the seat system.
- When using a bolster type seat with the Shark suspension (shown in second diagram below), ensure that feet are supported and not hanging. The suspension has lateral and fore-aft shock absorption designed to work in synergy with the legs. It is important to engage the legs when using this seat type.

Correct seating position on Shark seats

Correct seating position on bolster seat with Shark suspension unit
Installation guide
FLEX:
You may require a base (or Shark Plinth unit) to achieve the correct height. This can be purchased separately from Shark along with fasteners.
If using your own base, the front diagonal face of the FLEX unit must be supported and have the two fastening bolts inserted to affix it. Note: You may need to drill these holes to clear an M8 bolt.
Additionally, a minimum of 4 bolts per side (8 bolts on the horizontal mounting surface) are recommended.
The tear out force per bolt must exceed 500kg / 5000N to pass the stringent HSC2000 lateral loadings. Note that this may not be necessary for your application.
The top mounting surface has 4 rows of fore-aft bolt holes. The outer rows have centers 235 apart, the inner rows have centers 130mm apart. The fore-aft spacing of the holes is 30mm.
This seat mounting information is a guide only, Shark takes no responsibility for any injury or damage occurring during or as a result of the seat mounting process. There are many factors such as the presence of fuel tanks, and the deck strength, thickness and composition etc, that we do not have any information for. It is highly recommended that you consult your boat builder or a suitably qualified person to undertake the seat mounting process.
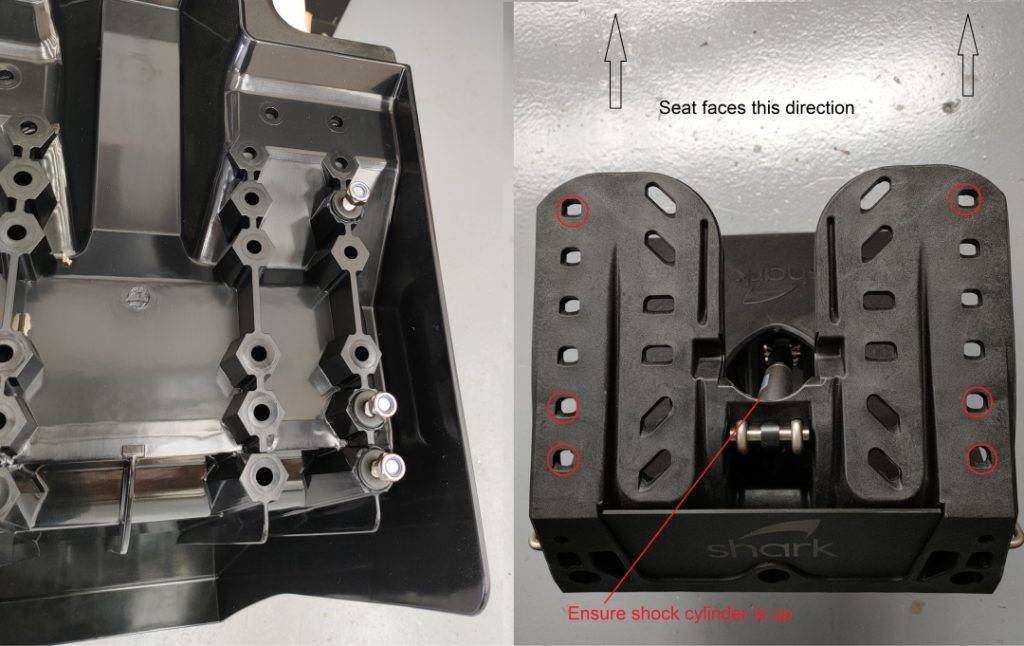
ULTRA and XTRA:
Align the 6 bolts on the underside of the seat, with the 6 holes as shown in Figure 1, use the washers and nuts provided and tighten firmly. Mount the seat with the backrest of the seat nearest the Shark logo plate on the suspension.
Figure 1. Seat to suspension mounting instructions.
Move the seat into the correct position on board and have someone hold it by the rear. If you are using the ULTRA seat, you may need a base (or Shark Plinth unit) to achieve the correct height. Align the seat so that you can comfortably reach the controls, or handholds (if this is a passenger seat).
Ensure there is at least 4 inches of clear space all around you when seated, and consider the possibility that larger and smaller people may use the seat. Once the seat is in the correct place, mark the mounting surface along the front edge of the plinth unit.
Use the A4 printable hole template and align this with the line you marked (print at actual size, with no scaling, on A4 paper). Ensure the template is oriented correctly and measure one of the dimensions once printed to confirm that it is the correct size. Drill the mounting surface in the correct positions.
Use a minimum of 8 bolts per seat as shown in Figure 2 and ensure the steel thick washers are used on the inside of the plinth. The tear out force per bolt must exceed 500kg / 5000N to pass the stringent HSC2000 lateral loadings. Note that this may not be necessary for your application.
Figure 2. Plinth showing the 8 bolts used for mounting to the desk (minimum).

This seat mounting information is a guide only, Shark takes no responsibility for any injury or damage occurring during or as a result of the seat mounting process. There are many factors such as the presence of fuel tanks, and the deck strength, thickness and composition etc, that we do not have any information for. It is highly recommended that you consult your boat builder or a suitably qualified person to undertake the seat mounting process.
LUXE:
Follow the instructions for ULTRA and XTRA.
If the armrests, headrest extension, and rear grab handle are not installed when delivered, please contact Shark for instructions.
Maintenance Procedures
Maintenance procedures should be carried out every 100 boat hours. In addition to these procedures, the seat should be hosed after exposure to salt water and left to dry. Do not leave the seat uncovered in direct sun unless it is in use.
THE SHOCK ABSORBER IS A REPLACEABLE PART.
PERFORM THE FOLLOWING CHECKS BI MONTHLY, OR EVERY 100 BOAT HOURS (WHICH EVER IS FIRST).
REMAINING TRAVEL CHECK:
The aim here is to use a marker to determine how much travel remains when the seat is being used. Ideally, the shock buffers can be used, but a rubber band or peg/clip may also be used.
Note the picture below for reference, with 3 surfaces marked A, B, and C.

- Slide the rubber buffer stack up the shock rod so that the top of the stack (B) makes contact with the cylinder end (A). NOTE: If there are no buffers on your shock, attach a peg, or tie a rubber band around the shaft, and slide this to the top so that it contacts the cylinder end (A).
- After typical or heavy use, check to ensure that the distance B-C is not less than 50mm. NOTE THAT 6 BUFFERS EQUATE TO APPROXIMATELY 45mm.
- If B-C is less than 50mm or if the bottom of the buffer stack is in contact with C, contact Shark to determine if a replacement is required.
- You can use this test whenever you have a concern about bottoming out, or if you want to test that a shock absorber is performing correctly.
OIL LEAKAGE CHECK:
Check the shock rod for excessive oil leakage (a thin film on the rod is normal). If there are droplets of oil visible, the shock needs to be replaced. In this case, contact Shark right away, and if possible, refrain from using the seat.
SHOCK ABSORBER REPLACE INSTRUCTION
DO NOT LUBRICATE THE HINGES ON THE SUSPENSION – KEEP CLEAN BY SPRAYING WITH FRESH WATER
| Check | Action every 100 boat hours |
|---|---|
| Inspection port seal present and in good condition. | Grease and fit new o-ring if necessary. Clean all other surfaces with dilute detergent to remove sand and salt deposits |
| Visual inspection of any cracks or deformation of plinth unit, especially around mounting points. | If there is any major damage present, change the plinth as soon as possible. Don’t use the seat until the plinth has been changed. |
| Force the seat back and forward and left and right to check for loosening of any bolts. | If you feel any excessive movement caused by loose bolts, investigate further (See below). |
| Inspection of all bolts on system for missing nuts. | Ensure all nuts are present on the bolt ends. These must be Nyloc type. Reach inside plinth to feel for nuts on all bolt ends. |
| Torque check of all nuts. | The 12 bolts on the inside of the suspension springs must be 10Nm. The bolts connecting the suspension to the plinth must be 5Nm.The bolts connecting the seat to the suspension must be 5Nm. |
| Visual inspection for any cracks and damage to the spring leaves or clamps. | General wear and tear is expected. If there is any major damage present, change the suspension as soon as possible. |
| Check for oil leakage from the shock absorber. | A thin layer of the oil on the shaft is normal. If there is excessive oil or the oil has sprayed out, do not use the unit. Contact your supplier. |
| General cleaning of the system. | Clean all surfaces with dilute detergent to remove sand and salt deposits. |
| Visual inspection for cracking and material fatigue. Remove the back foam insert if present and check the back of the seat for cracking or deformation. | If there is significant damage, contact your supplier before continuing use. If there is damage to seating upholstery, contact your supplier. Ensure the seat is not exposed to the sun unless in use. |